Setting the file name of a scanned image
Set how to name a scanned image file.
-
Click the [Detail Settings] button in [File name] of the Select output panel editing dialog.
For Standard Scanning -> Setting the output
For Scanning Shortcut -> Setting the output
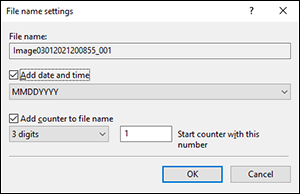
[File name settings] dialog is displayed.
The file name is a combination of "string" and "serial number". You can add the time and date in the "string" portion of the name.
If there is another file with the same name at the saving destination, it works as follows:-
If the existing file name does not contain a serial number, a three-digit serial number will be added automatically and the file will be saved.
Example: If you try to save a file as [Test.pdf] and another file with the same name already exists, the file will be saved as [Test_001.pdf].
-
If the existing file name does contain a serial number, the subsequent serial number will be automatically added and the file will be saved.
Example: If you try to save a file as [Test_04.pdf] and another file with the same name already exists, the file will be saved as [Test_05.pdf].
[File name]
File name of scanned image to be saved, will be displayed. You cannot enter the name.
[Add date and time]
Specify if you set the date and time to the file names.
Check this on to enable pull-down menu. Specify how to display time and date in the list box.
[Add counter to file name]
Specify whether to add sequence number to the file name.
Check this on to enable pull-down menu and text form to specify digit and opening number of the sequence numbers. Maximum: 6 digits.
If the number of files exceeds the specified digits, the digit will be increased automatically to add more sequence numbers.
-