Environmental Settings
Configure the environmental settings for CaptureOnTouch.
-
Click the
 (CaptureOnTouch Icon) on the taskbar.
-
Click [Environmental settings] on the menu.
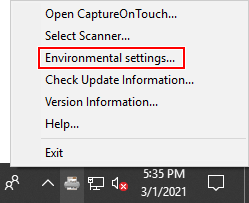
[Environmental settings] dialog is displayed.
You can also open this dialog by clicking  (menu icon) in the main screen and selecting [Environmental settings] from the resulting menu.
[Basic settings] Tab
The [Basic settings] tab lets you configure the settings about the basic operations of CaptureOnTouch.
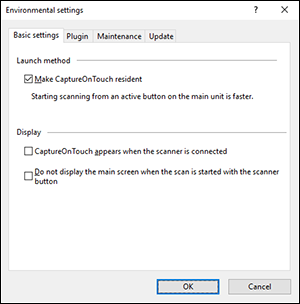
[Make CaptureOnTouch resident]
By default, CaptureOnTouch becomes resident in the system when the computer starts. You can make it no longer resident in the system by unchecking this item.
[CaptureOnTouch appears when the scanner is connected]
If you check this, the main screen of CaptureOnTouch automatically opens when the scanner is connected to the computer. This setting is only enabled when CaptureOnTouch is running (or resident in the system).
When this setting is enabled, the [Do not display the main screen when the scan is started with the scanner button] setting is disabled.
[Do not display the main screen when the scan is started with the scanner button]
If you check this, the main screen of CaptureOnTouch is not displayed when Shortcut Scanning is started from the scanner. However, dialogs and error messages during scanning and the pop-up screen when the scan is completed will be displayed.
When this setting is enabled, the [Edit after scanning] and [Enable additional scan] check boxes on the Scanning Shortcut panel settings screen are disabled. -> Setting options
[Plugin] Tab
The [Plugin] tab lets you view the information about the plugins added to CaptureOnTouch.
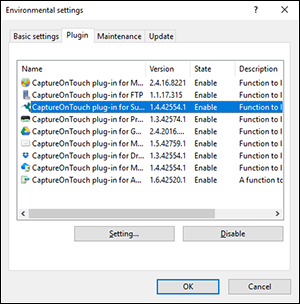
[Setting] button
Displays the detailed information on the selected plugins.
This button may not be displayed for some plugins.
[Enable] [Disable] button
This button is used to toggle between Enable/Disable modes for the plugin selected from the plugin list.
If you click the [Disable] button, the following dialog is displayed.
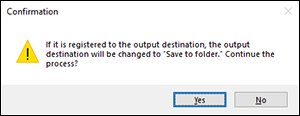
The output is changed to the initial value (Save to folder) in all the panels for which the disabled plugin is set as the output.
[Maintenance] Tab
On the [Maintenance] tab, you can configure the log settings for the maintenance of CaptureOnTouch and initialize the settings.
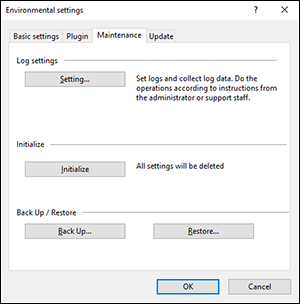
[Log settings]
If you click the [Setting] button, the [Log File Settings] dialog is displayed.
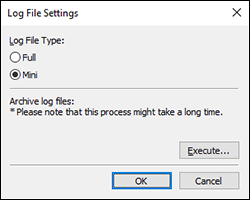
If you select the type of the log file in [Log file type] and click the [Execute] button, the log file is saved.
The operation slows down if you select [Full] for [Log file type].
[Initialize]
A confirmation dialog box appears when you click the [Initialize] button.
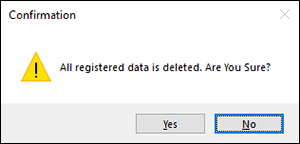
All CaptureOnTouch data are deleted and returned to the default settings.
[Back Up] button
Back up the settings of CaptureOnTouch to a backup file (*.cot). You can store the initial settings of CaptureOnTouch by performing a backup before you first use CaptureOnTouch.
[Restore] button
Restore the settings from the backup file. When using multiple computers, you can back up the environmental settings of one computer and then perform a restore on the other computers so that all of the computers have the same settings.
[Update] Tab
On the [Update] tab, you can configure whether CaptureOnTouch checks for newer versions of programs that can be used with your scanner periodically.
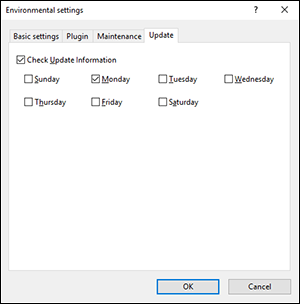
[Check Update Information]
Checking this enables CaptureOnTouch to access the software distribution server and check for an update program automatically.
You can also specify the day of the week when CaptureOnTouch checks for an update.