Standard Scanning
Select a document and output for scanning.
-
Launch CaptureOnTouch.
-
Select a scanner.
-
Place the document in the scanner.
For details, refer to the manuals for your scanner.
-
Click the select document panel for the document to be scanned from [1 Select document].
The selected [Select document] panel will be displayed in orange.

If you click
 , the [One Touch Scan] area will be displayed. -> One Touch Scan
To change the document to scan
-
Click the output panel for the scan image application from [2 Select output].
The selected [Select output] panel will be displayed in orange.

To change the output
-
Click the [SCAN] button.
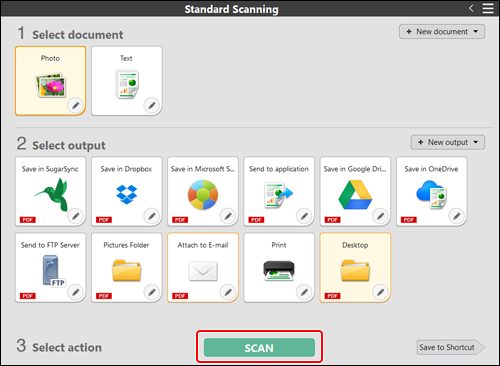
The document is scanned. While scanning is in progress, the number of pages scanned is displayed in addition to the scanner settings.
When scanning is complete, the preview screen will be displayed.
-
If using the same document selection and output combination the next time, click the [Save to Shortcut] button. The selected [Select document] and [Select output] will be added to the [One Touch Scan] panel. -> One Touch Scan
-
If a flatbed options driver is installed in the models that support flatbeds, the scanner will operate differently depending on its settings. -> Select document settings
-
If [Use advanced settings dialog box] is disabled in the Select document settings, [Auto-switching to main scanner / flatbed] is used for scanning.
-
If [Use advanced settings dialog box] is enabled in the Select document settings, scanning is performed according to the settings in the advanced settings dialog box.
-
-
-
Check the scanned image on the preview screen.

To scan continuously
Place the next document, and then click the [Continue scanning] button. The scanning of the document will start.
To edit a scanned image
-> Editing
To change the output
Click
 . -> Setting the output
 -
Click the [Finish] button.
Click the [Cancel] button to discard the scanned image and return to the main window.
When the output has finished, a popup window will be displayed. If saving the scanned image, a link to open the save destination folder will be displayed.

If you click [Open storage folder], the folder in which the saved scanned images were saved opens. Depending on the output settings, the [Open storage folder] button may not be displayed.
This completes the Standard Scanning.