Select document settings
Set the document type, resolution, and others for scanning.
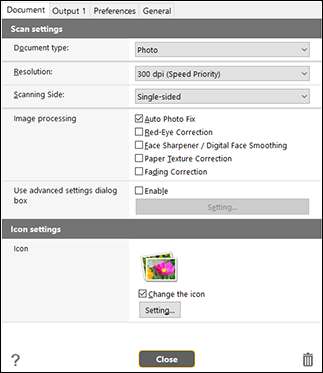
When [Document type] is [Photo]

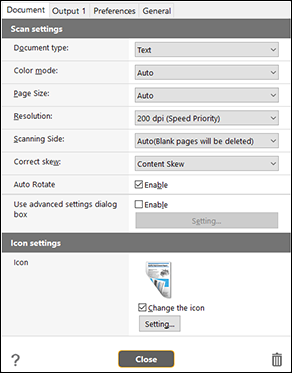
When [Document type] is [Text]

[Document type]
Select the type of document to scan.
-
Photo
The setting items in [Scan settings] are suitable for photos.
-
Text
The setting items in [Scan settings] are suitable for documents.
[Color mode] (Only when [Document type] is [Text])
Select the color mode for scanning from below.
-
Auto
Automatically determines the color mode based on the document content and scans accordingly.
-
Color
Scans the document in color.
-
Grayscale
Scans the document in Grayscale.
-
Black and White
Scans the document in black and white (binary).
[Page Size] (Only when [Document type] is [Text])
Select the paper size of the document to be scanned.
Select [Auto] to scan the document at its original size.
[Resolution]
Select the resolution.
Select [Auto] and the software will automatically scan the document at the optimum resolution.
When [Document type] is [Photo], you can select [300 dpi], [600 dpi], or [1200 dpi]. When it is [Text], you can select [Auto], [200 dpi], [300 dpi], [400 dpi], or [600 dpi].
[Scanning Side]
Select the scanning side of the document.
If you select [Auto(Blank pages will be deleted)], scanned images of blank pages are not saved.
[Image processing] (Only when [Document type] is [Photo])
Corrects for photos so they are scanned more beautifully.
-
Auto Photo Fix
Select this check box to analyze the scene shot in the photo and to optimize corrections for the photo automatically.
-
Red-Eye Correction
Select this check box to make eyes that appear red due to the flash less noticeable.
-
Face Sharpener / Digital Face Smoothing
Select this check box to sharpen the focus on faces of people who are out of focus. It also processes them so skin is more beautiful by making blemishes and wrinkles on the skin less noticeable.
-
Paper Texture Correction
Select this check box to make the matte texture patterns of the paper less noticeable.
-
Fading Correction
Select this check box to correct for photos that are faded, such as due to aging.
[Correct skew] (Only when [Document type] is [Text])
If a document is not straight when fed, the scanner detects that the document is not straight from the scanned image and straightens the skewed image.
Select the setting from below.
-
[OFF]
-
[Paper Skew]
-
[Content Skew]
[Auto Rotate] (Only when [Document type] is [Text])
If you check this, the scanner recognizes the orientation of text in the scanned image and rotates the image to correct the orientation of text.
[Use advanced settings dialog box]
Document scan settings include basic items that are configured in [Scan settings], and the settings that are configured in the advanced settings dialog box. The settings in the advanced settings dialog box are applied for settings other than the basic items.
If you check this, the advanced scanner settings other than the basic items will be made in the advanced settings dialog box (scanner driver). To open the scanner driver, check this item and then click the [Setting] button.
The driver settings dialog box includes setting items that are the same as the basic items in [Scan settings], but the setting for each of the them is stored separately.
Which settings are used during scanning differs as follows depending on the setting of the [Use advanced settings dialog box] check box.
| Setting of [Use advanced settings dialog box] | Basic items | Other than basic items |
|---|---|---|
| OFF | Settings of [Scan settings] | Settings of the advanced settings dialog box of the scanner driver |
| ON | Settings of the advanced settings dialog box of the scanner driver | |
For the advanced settings other than the basic items, see the help in the driver settings dialog box.
[Icon]
Used icon will be displayed. Check [Change the icon] on to enable [Setting] button to select and change icon file.
Readable icon file types are listed below.
.ico, .exe, .jpg, .png
 button
Displays the Help.
[Close] button
Save the settings, and close the dialog.
 button
Deletes the button.

