Setting the Select document panel
To specify the document size, color mode, and other settings, set the desired scan condition by editing the scan mode panel.
A title, an icon, and  button are displayed on Select document panel. Items to be displayed will vary according to the size and settings of the panel. When the Select document panel is clicked, it will be in selected state. You can sort the panel using drag-and-drop.
Creating new Select document panels
To create a new Select document panel, use one of the following methods.
Method 1
-
Click the [New document] button of [1 Select document].
A [New document] panel will be created.
-
Click the
button. -
Edit its contents as you like.
Method 2
-
Click
 of the [New document] button.
 -
From the resulting menu, select the type of the panel.
A Select document panel will be created with the contents you have selected.
Editing the Select document panel
-
Click the
button of the Select document panel.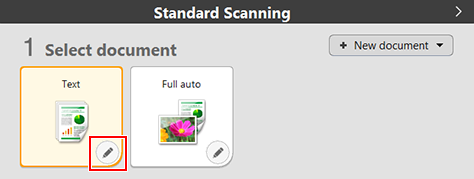
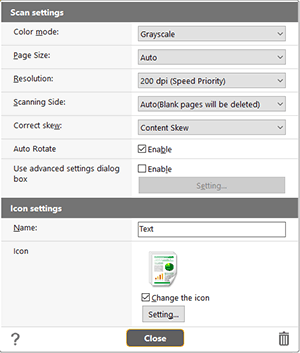
The Select document panel editing dialog will be displayed.
-
Set each item.
-
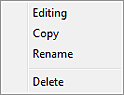
Right-clicking on the selected panel displays the following menu.
-
Editing: displays the Select document panel editing dialog.
-
Copy: creates a copy of the panel.
-
Rename: changes the name of the panel.
-
Delete: deletes the panel.
-
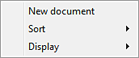
When right-clicked on any other areas than panels, the following menu will appear.
-
New document: creates a new panel.
-
Sort: sorts panels by name or by use frequency. You can select the sorting from the ascending or descending order.
-
Display: changes the panel size to Large, Medium or Small. By default, Medium is selected.