Setting the output
Set the output after scanning, file name, etc.
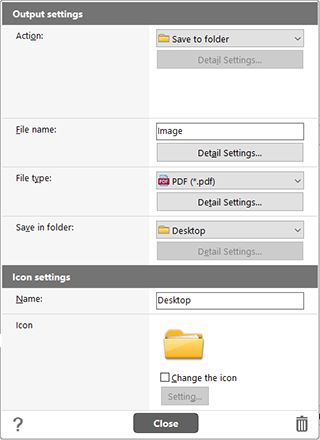
[Action]
Select the method to output scanned images from below. File format or saving location varies upon the selected output method. If you select a plug-in for the software that came with the scanner, it will be saved to the prescribed location in order to allow the interaction with the software.
-
Save to folder
Save scanned images in folder displayed in [Save in folder]. Select [Browse] in [Save in folder] to display Folder selection dialog and save images in the selected folder.
-
Attach to E-mail
-
Send to application
-
Print
CaptureOnTouch supplies output methods other than [Save to folder] as plugins.
By installing the plug-in, you can use various services such as printing the scanned image or attaching it in an e-mail.
To install plugins, enable the checkbox when installing CaptureOnTouch.
The output methods that can be selected depend on the plugins that have been installed.
For how to use the plugins, see the plugin help.
[File name]
Enter the file name of scanned image. Maximum: 64 characters.
-
\ / : * ? < > | “ characters cannot be used.
-
Click [Detail Settings] button to configure the file name generation rule. -> Setting the file name of a scanned image
[File type]
Specify the file format for saving the scanned image.
If PDF, JPEG, TIFF, or PPTX is selected, [Detail Settings] button is enabled and the details of file type can be configured.
-
PDF format -> PDF file setting
-
JPEG format -> JPEG file setting
-
TIFF format -> TIFF file setting
-
PNG format
-
PPTX format (File format for Microsoft PowerPoint 2007 and later) -> PowerPoint(R) settings
-
BMP format
-
File types to be selected may differ depending on the output method or available plugin settings.
-
When you output the scanned image using the plug-in, the image is output in the file format set in the application of the plug-in. Therefore, the file format may differ from the one you select in this item.
[Save in folder]
Specify the storage location for scanned images.
It hides if the output method other than [Save to folder] is selected. Select the saving location from below.
-
Pictures
-
Documents
-
Desktop
-
(Specified folder path)
-
Browse
Select [Browse] to display Select folder dialog to specify the folder. Folder specified in this step will be displayed as option in (specified folder path) next time.
Click [Detail Settings] button to display [Folder settings] dialog. You can configure the credentials (user name and password) for the access to the specified folder.
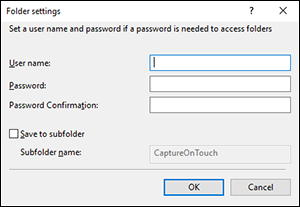
Check [Save to subfolder] on to specify the subfolder as the storage location for scanned images. If the specified folder does not exist, a new folder will be created.
[Name]
Enter name of the Select output panel. Maximum: 40 characters.
[Icon]
Used icon will be displayed. Check [Change the icon] on to enable [Setting] button to select and change icon file.
Readable icon file types are listed below.
.ico, .exe, .jpg, .png
 button
Displays the Help.
[Close] button
Save the settings, and close the dialog.
 button
Deletes the panel.