Editing
Edit a scanned image.
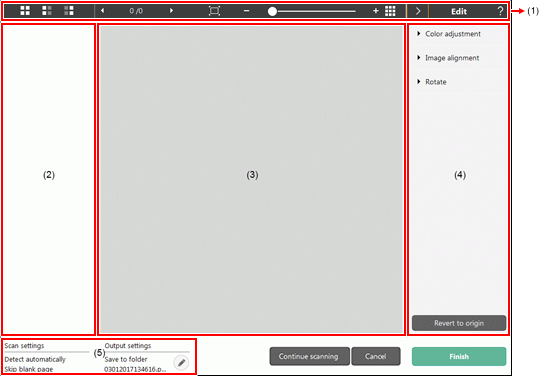
To display the edit window in the preview window, click  on the tool bar.

(1) Toolbar
This tool bar enables operations to thumbnails and preview images.
| Tools | Description |
|---|---|
 |
Switches the image selection for the thumbnail area. These buttons mean [Select all pages], [Select odd pages] and [Select even pages] from the left. |
 |
Indicates the page of the image displayed on the preview. Click   to change the page to be displayed. to change the page to be displayed. |
 |
Changes the display magnification. Move the slider to + (plus) or - (minus) to enlarge or reduce the preview image. Click  to make the display magnification of the preview enlarged to full-screen. to make the display magnification of the preview enlarged to full-screen. |
  |
Click to display or hide the preview area. |
 |
Click  to display or hide the Edit window. to display or hide the Edit window. |
 |
Click to display the Help. |
(2) Thumbnail Display Area
Thumbnails of the scanned documents will be displayed. You can implement the following operations.
-
Click a thumbnail to display a preview of the scanned image in the preview window.
-
Drag a thumbnail to change pages.
-
Use the arrow keys to change the selected thumbnail.
-
To select more than one thumbnail, hold down the Ctrl key while clicking desired images.
-
When you right-click the thumbnail of an image, it becomes selected and the following menu appears:
-
Select: "All pages", "Odd pages", "Even pages”
The targets are all pages in the thumbnail.
-
Replace: "Previous page", "Next page"
-
Delete: A confirmation message is displayed. If multiple images are selected, they are deleted at the same time.
-
If [Create a file for each specified number of pages] is selected for [TIFF setting] or [PDF setting], a separator is displayed for a thumbnail. When you right click the separator, this becomes selectable and the following menu is displayed:
-
Select: "All pages", "Odd pages", "Even pages”
The targets are the pages in the document separated by separators.
-
Delete: A confirmation message is displayed. If multiple images are selected, they are deleted at the same time.
-
To change the display area of a thumbnail, drag the border between the thumbnail display area and the preview area. After this change, the display size of the image will be changed.
-
You can delete a selected image by pressing the Delete button on your keyboard.
(3) Preview Area
The preview images of scanned documents are displayed.
(4) Edit window
You can edit scanned documents.
Click an item to open the edit window.
Click the [Revert to origin] button to discard the edit results and return to the previous scan image.
If [Edit after scanning] is disabled in the One Touch button settings, the edit window will not be displayed. -> Setting options
[Color adjustment] (Easy settings)
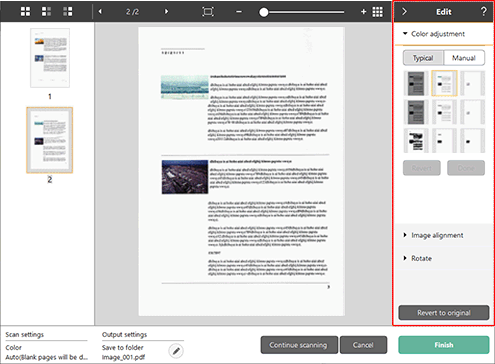
Click [Color adjustment] to display the default.
Click the button to toggle between the typical settings and manual settings displays.
In Easy settings, click thumbnail images and select the one that displays the most suitable preview image.
9 thumbnail patterns are displayed for the relevant image in color, and 6 patterns in grayscale.
When adjustment is finished, click the [Done] button. To cancel the adjustment, click the [Revert] button.
[Color adjustment] (Manual settings)
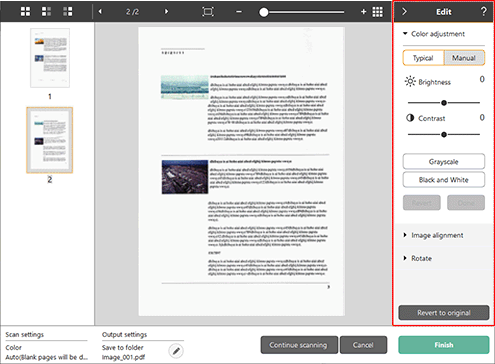
Move the slider to the left or right to adjust the brightness and contrast of the image, checking the preview image.
Click the [Grayscale] button to render the image in grayscale.
Click the [Black and White] button to render the image using 2 values: black and white.
When adjustment is finished, click the [Done] button. To cancel the adjustment, click the [Revert] button.
[Image alignment]
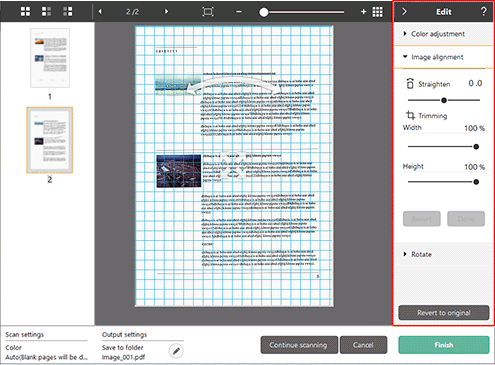
Click [Image alignment] to display.
The preview image or the slider can be used for the straightening and the trimming. In the preview image, drag the Move grip  , the Straighten grip
  and/or the trimming frame directly. To change the extent of the trimmed image, drag the Move grip on the preview.
When adjustment is finished, click the [Done] button. To cancel the adjustment, click the [Revert] button.
[Rotate]
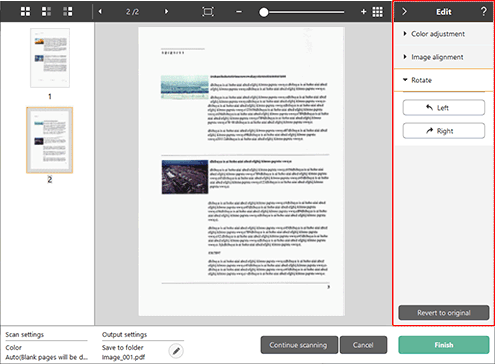
Click [Rotate] to display.
The scanned image can be rotated in 90 degrees to the left or the right. The rotation can be adjusted according to the preview image.
(5) Information Display Area
The information regarding the "Select document" and "Select output" is displayed.
-
If you click the
 button, you can set Select document and Output.
 -
Click the [Continue scanning] button to continue the scanning.
-
Clicking the [Cancel] button will destroy the scanned images and return to the top screen.
-
When clicking the [Finish] button, the output processing will start. After it is completed, a popup window will be displayed. If saving the scanned image, a link to open the save destination folder will be displayed.
The [Continue scanning] button is not displayed if you disable [Continue scanning] in the One Touch button settings. -> Setting options